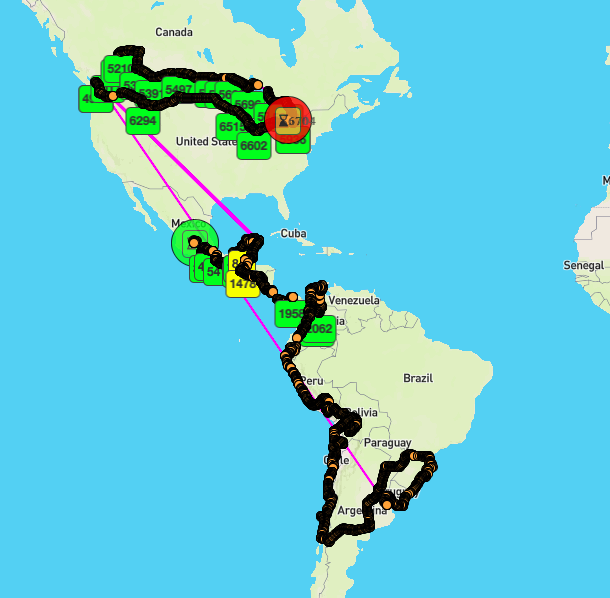
North & Central
- USA to Mexico (Douglas)
- Mexico to Belize (Chetumal)
- Belize to Guatemala (Benque Viejo)
- Guatemala to El Salvador (Valle Nuevo)
- El Salvador to Honduras (El Amatillo)
- Honduras to Nicaragua (El Espino)
- Nicaragua to Costa Rica (Peñas Blancas)
- Costa Rica to Panama (Paso Canoas)
South
- Panama to Colombia
- Colombia to Ecuador (Rumichaca)
- Ecuador to Peru (Huaquillas)
- Peru to Bolivia (Desaguadero)
- Bolivia to Chile (Pisiga)
- Chile to Argentina (Paso Cardenal Antonio Samoré)
- Argentina to Brazil (Iguazu)
- Brazil to Uruguay (Jaguarão)
- Uruguay to Argentina (Fray Bentos)
***
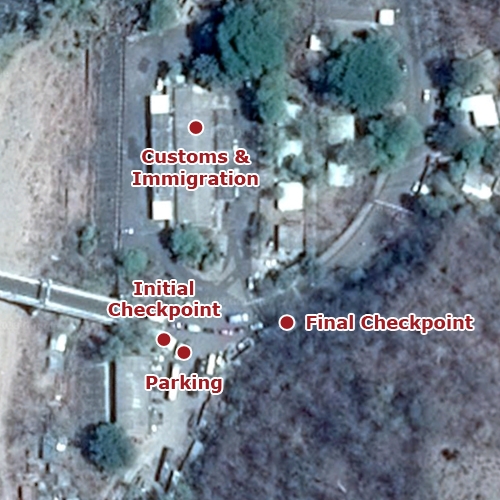
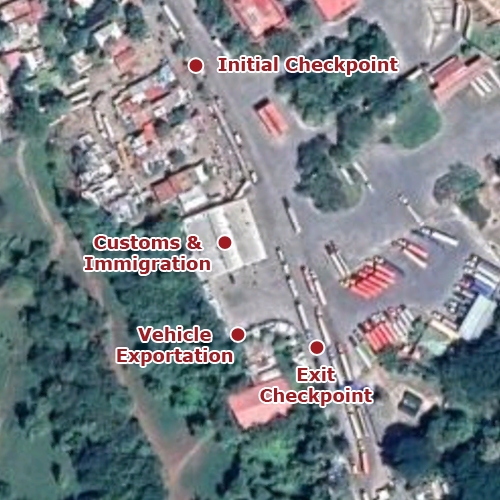
USA to Mexico
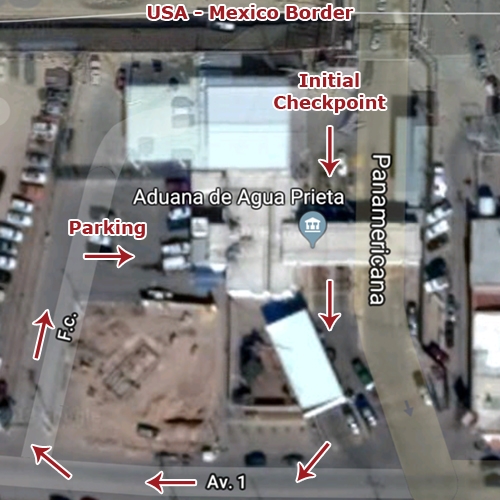
Douglas Border
Thursday – August 10, 2017
Entering Mexico
Duration: 30 minutes
- Keep right after passing the border to get to the initial checkpoint where your passport will be checked
- Go around to the back of the building to park; entrance to the building is accessible from the parking lot
- Go to the Customs or Aduana window to fill out the form for your tourist card
- Go to the Banjercito window to pay for the tourist visa; we paid 532 MXN
- Return to the Customs window to get your stamp
- To get Temporary Vehicle Import Permit, you need copies of the following (they make the copies for you):
- Tourist visa
- Passport
- Vehicle’s registration
- 400 USD
- Once everything is submitted, you get the Temporary Vehicle Import Permit, and then are free to enter Mexico
Vehicle insurance is mandatory in Mexico
***
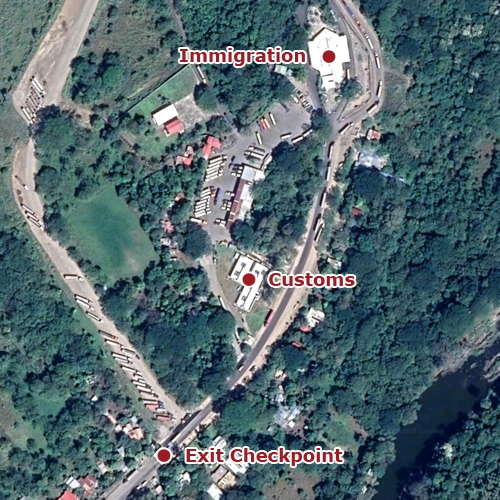
Mexico to Belize
Chetumal Border
Monday – January 8, 2018
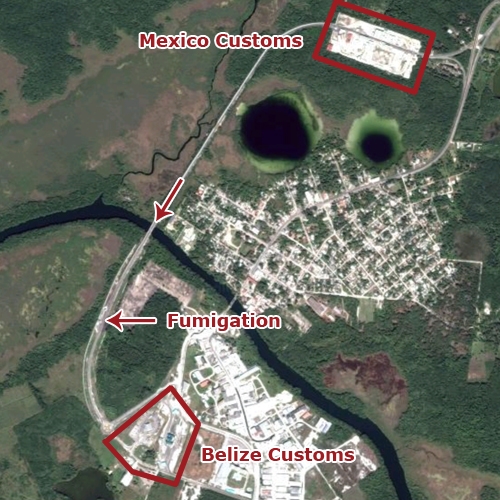
Exiting Mexico
Duration: 30 minutes
- Go to the Immigration window with your tourist card and receipt to get your passport stamped
- To cancel the Temporary Vehicle Import Permit, go to the Banjercito and show the following documents:
- Temporary Vehicle Import Permit
- Passport
- Vehicle’s registration
- One of the officers will accompany you to your bike to take a picture of the VIN before returning inside to complete the paperwork
- You will get a receipt and then are free to approach Belize; the refund for the Temporary Vehicle Import Permit should get credited to your account within a few days
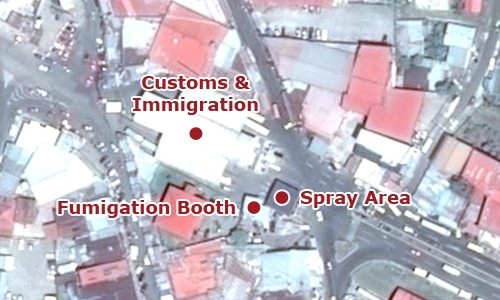
Entering Belize
Duration: 1 hour 30 minutes
- Before getting to the Belizean Customs, you will need to go through fumigation and pay 10 BZD
- After fumigation, head towards the Customs and Immigration building, and park in the designated area where you will need to pay an entry fee of 15 BZD
- Enter the Customs and Immigration building and fill out the required form; you will need to put the address for where you will be staying in Belize
- Once the form is filled, go to the Immigration window to get the entry stamp
- Proceed to the Customs window with your passport and the vehicle’s registration to do the vehicle import
- Once the vehicle importation is done, you can head towards the exit where your passport and documents will be checked
- The insurance building is across the street and price varies based on the duration for which you need it; we paid 35 BZD for 7 days
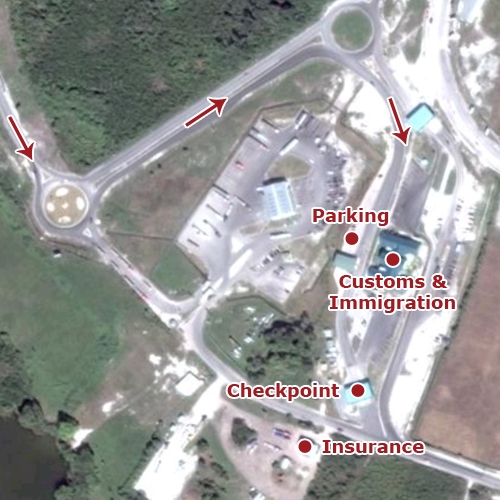
Vehicle insurance is mandatory in Belize
***
Belize to Guatemala
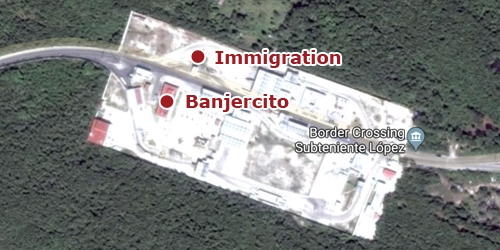
Benque Viejo Border
Friday – January 12, 2018
Exiting Belize
Duration: 30 minutes
- Park just before the Customs and Immigration building
- Enter the building to get your passport stamped and pay the 40 BZD exit fee
- Get the cancellation stamp on your vehicle importation document and proceed towards Guatemala
Entering Guatemala
Duration: 30 minutes
- After crossing over from Belize, proceed past the car-wash-like fumigation areas through the small gap for pedestrians on the right side of the building
- Stop at the first building on the right where you will pay 2 USD in exchange for a ticket and someone will spray your bike right away
- Proceed to the Customs and Immigration building and get your entry stamp
- Copies of the following documents will be required:
- Passport
- Driver’s license
- Vehicle’s registration
- One of the officers will accompany you to your bike to inspect the license plate and VIN
- You will need to pay 160 GTQ to the cashier in the same building
- Once the payment is complete, return to Customs to get your paperwork and sticker, and then you can proceed into Guatemala
- Once you cross the bridge, you will be stopped and asked to pay 10 GTQ (no explanation as to what this was for)
Vehicle insurance is not mandatory in Guatemala
***
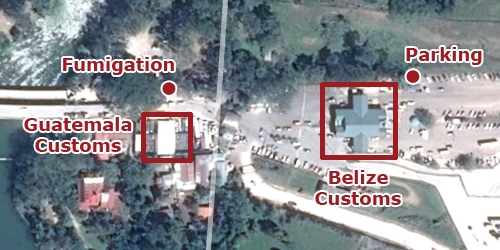
Guatemala to El Salvador
Valle Nuevo Border
Monday – February 19, 2018
Exiting Guatemala
Duration: 30 minutes
- Park on the right, just before the Customs and Immigration building
- Enter the Immigration section of the building to get your passport stamped and be given a ticket to retain for when you get to the El Salvador side
- Proceed to the Customs section of the building to cancel the vehicle importation
- The following documents will need to be presented:
- Passport page with the entry stamp
- Driver’s license
- Vehicle’s registration
- One of the officers will accompany you to your bike to inspect the license plate and VIN
- After the paperwork is completed and the vehicle importation document has the cancellation stamp, you can proceed towards El Salvador
Entering El Salvador
Duration: 40 minutes
- After crossing over from Guatemala, turn right after the first building and park
- Enter the building with copies of the following documents:
- Passport
- Driver’s license
- Vehicle’s registration
- You will be required to fill out a form (in Spanish)
- One of the officers will accompany you to your bike to inspect the license plate and VIN
- The officer will prepare the paperwork and accompany you to the Customs and Immigration building
- The paperwork will be processed for the vehicle importation and you will be asked to sign a copy and be given one for your records
- Proceed to the final checkpoint where your passport will be checked, the ticket from the Guatemalan customs will be taken, and you will be free to enter El Salvador
Vehicle insurance is not mandatory in El Salvador
***
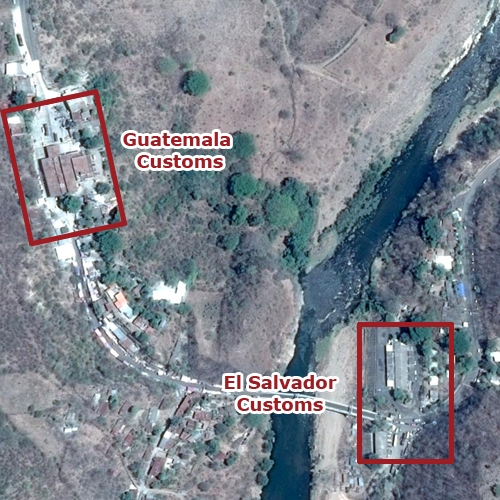
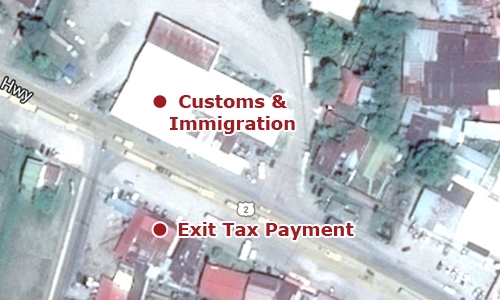
El Salvador to Honduras
El Amatillo Border
Friday – February 23, 2018
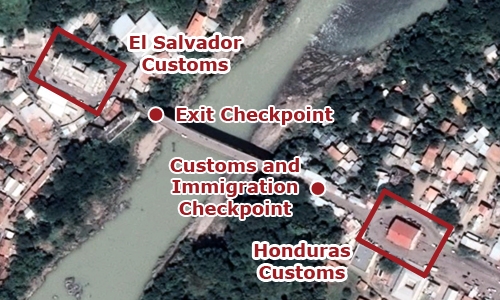
Exiting El Salvador
Duration: 20 minutes
- When we went to the El Amarillo border, there was a line of trucks going for about 2 kilometers so, a border services employee (identified by their blue polo shirts) guided us to the office where we could park the bike and cancel the vehicle importation
- Once the vehicle importation is cancelled, the document will get a stamp and you will receive two copies of the cancelled vehicle importation
- When you have the vehicle importation cancellation and the copies, you can proceed towards the Customs building and park in the covered area
- Go to the last window to get your passport scanned and receive a ticket to retain for when you exit El Salvador
- Once you receive the ticket, go to the Customs window on the other end of the building to get your vehicle importation cancellation document verified
- When exiting, the ticket will be taken at the checkpoint before you can proceed to Honduras
Entering Honduras
Duration: 2 hours
- After crossing the bridge into Honduras, you will be stopped at a checkpoint for a survey by an Immigration officer and to submit the following documents to a Customs officer:
- Passport
- Driver’s license
- Vehicle’s registration
- Vehicle importation cancellation
- Park in front of the building and follow the Customs officer into the building where he gives the documents to the officer at the Customs window and returns the passport to you so you can go through Immigration
- We arrived just after a tour bus so the line-up for Immigration was very long, making our border crossing longer than it needed to be; when you get to the window:
- Your passport will be checked and scanned
- Your fingerprints will be scanned
- A picture will be taken of you
- You will need to pay 3 USD for the entry stamp
- A ticket will be given that you will need to retain for when you exit Honduras
- Return to the Customs window to give your stamped passport to start the processing of the vehicle importation
- The officer will prepare and give you a stamped invoice and circulation authorization when returning your documents
- You will need copies of the following documents (copy store is on the left of the Customs building):
- Passport
- Driver’s license
- Vehicle’s registration
- Stamped invoice (x 2)
- Circulation authorization (x 3)
- Submit the copies at the Customs window and pay 35 USD or 840 HNL for the vehicle importation
- You will receive the vehicle importation permit and a copy
- As you exit, an officer will take the copy before you are free to proceed into Honduras
Vehicle insurance is not mandatory in Honduras
***
Honduras to Nicaragua
El Espino Border
Saturday – February 24, 2018
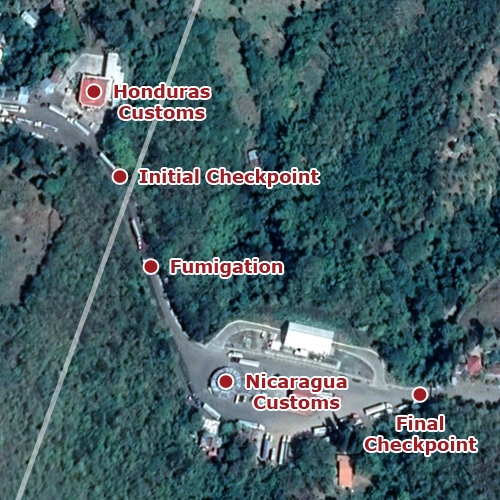
Exiting Honduras
Duration: 30 minutes
- As you approach the border, you will be stopped at a checkpoint for a survey by an Immigration officer
- After the survey, proceed towards the Customs and Immigration building and park in the lot in front
- Go to the Immigration window that is on the left of the building:
- Your passport will be given the exit stamp
- Your fingerprints will be scanned
- The ticket given when entering Honduras will be taken
- Go to the Customs window inside the building to cancel the vehicle importation with the following:
- Passport with the exit stamp
- Cancellation authorization
- A copy of each of the above documents
- Once the cancellation is complete, you can proceed towards the Nicaragua customs
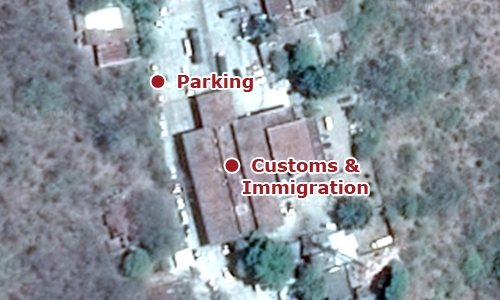
Entering Nicaragua
Duration: 4 hours
- As you approach Nicaragua, you will be stopped at a checkpoint where your passport will be checked and you will be given a form to fill out later
- Once you pass the checkpoint, you will arrive at the fumigation area shortly afterwards where you have to dismount your bike and pay 3 USD to have your bike sprayed; you will get a receipt
- After fumigation, proceed and park in front of the blue building; the people selling insurance will be outside, near the entrance so you can buy insurance before going inside; the cost is 12 USD or 380 NIO for the month and you will need to show the following:
- Passport
- Driver’s license
- Fill out the form you received at the checkpoint earlier and then go to the immigration window with the following:
- Passport
- Copy of the passport photo page
- Vehicle registration
- Wait while the paperwork is processed; the wait is a long one that significantly stretched our time spent at the border; we made the mistake of not filling out and emailing the Application for Admission form beforehand that could have reduced the amount of time we spent
- Once the paperwork is complete, you will need to pay 12 USD per person and the following will be given back to you:
- Passport
- Receipt
- Ticket
- You will then need to unload and open any luggage you have for inspection; beware if you are travelling with a drone as Nicaragua does not allow bringing in drones so, either hide it well or prepare to part with it
- After inspection, go to the Customs window around the side of the building to do the vehicle importation
- Once you get your documentation, you can proceed towards the exit
- At the final checkpoint, your passport will be checked and the ticket given at the Immigration window will be taken before you can proceed into Nicaragua
Vehicle insurance is mandatory in Nicaragua
***
Nicaragua to Costa Rica
Peñas Blancas Border
Friday – March 16, 2018
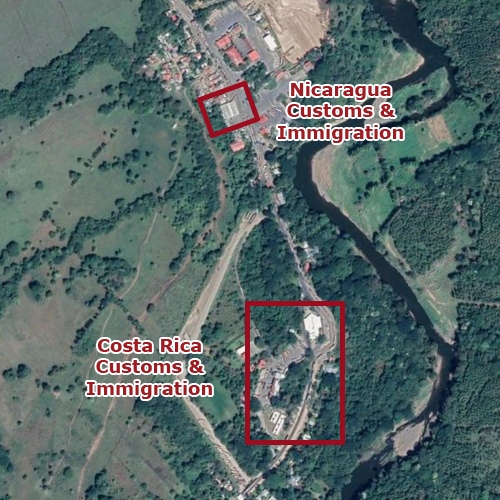
Exiting Nicaragua
Duration: 30 minutes
- As you approach the border, you will pass through a blue gate and arrive at a checkpoint where a border official will ask to see your passport
- You can then proceed towards the Customs and Immigration building, which is on the right and resembles a supermarket; parking space is in front of the building
- Enter the building to get your passport stamped at the Immigration window and pay the fee of 3 USD
- After getting your passport stamped, go outside and find a customs officer to cancel the vehicle importation; the officers are usually walking around outside and can be recognized by their fluorescent vests
- The officer will give you a form to fill, which you will need to fill out and return to him with the following:
- Copy of driver’s license
- Copy of vehicle registration
- Vehicle importation document for Nicaragua
- The officer will inspect the bike, sign off and return the form to you, and give your documents to another customs officer in a booth across the parking lot
- The officer in the booth will return the vehicle importation document for Nicaragua with a stamp to validate the cancellation
- Return to the Customs and Immigration building and go to the Customs counter near the back to submit the vehicle importation cancellation and get the customs form stamped
- At the final checkpoint, your passport will be checked and the customs form will be taken before you can proceed towards Costa Rica
Entering Costa Rica
Duration: 1 hour
- As you approach Costa Rica, stay on the right to get to the Immigration building where you will get your passport stamped and show your vehicle registration
- There is a booth outside the building where you will need to do the vehicle importation; we chose to use one of the official-looking helpers walking around the area to assist us with the process and speed things up
- You will need copies of the following (if you don’t have any, the helper can make these for you):
- Passport
- Driver’s license
- Vehicle registration
- The document copies and the original vehicle registration will be given to the officer at the booth and a form was given to fill
- The helper can fill this form for you and return it to the officer, who will then check the plates and VIN of the bike
- Once the vehicle importation is complete, you will receive a stack of documents and can then proceed towards the Customs building
- You will need to show the stack of documents to the insurance officer inside the building to purchase insurance for the bike; we paid 32 USD for 3 months, which is the minimum you can get
- The stack of documents will then need to be given to the officer at the Customs window and you will get the importation document back with a receipt
- We paid the helper 2,000 CRC, which he did not seem to be very happy with, but we did not have any additional change to give him
- At the final checkpoint, your passport will be check and the receipt given at the Customs window will be taken before you can proceed into Costa Rica
Vehicle insurance is mandatory in Costa Rica
***
Costa Rica to Panama
Paso Canoas Border
Wednesday – April 4, 2018
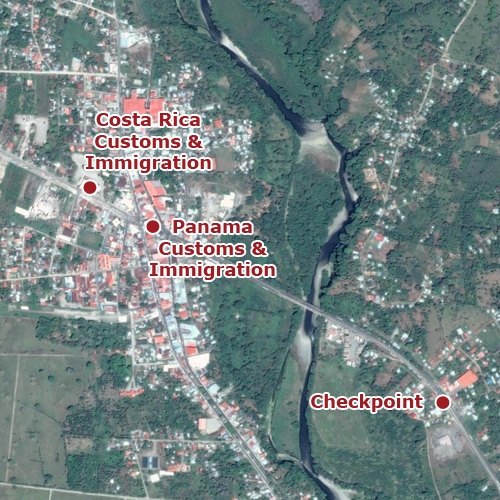
Exiting Costa Rica
Duration: 15 minutes
- As you approach the border, you will see the Panama building from afar; however, you will need to stop at the easy-to-miss blue and white Costa Rica Customs and Immigration building on the left beforehand
- Park in front of the Customs and Immigration building and then go across the street to pay the exit tax; official value is 7 USD, but they charged 8 USD (we paid 4,800 CRC) per person
- Return to the Customs and Immigration building and get the exit stamp on your passport at the Immigration window
- After getting your passport stamped, go around the corner to the Customs office at the back to cancel your vehicle importation
- You will be given a form in Spanish that you will need to fill and return to the officer with your vehicle importation document
- The officer will keep the vehicle importation document and return the form to you with a stamp on it, and then you can proceed to Panama
Entering Panama
Duration: 30 minutes
- Pull up to the right side of the Customs and Immigration building and you will be approached by an official helper who will guide you to a spot to park
- The helper will guide you to the other side of the building to purchase insurance (cost is 9,000 CRC per month); you will need the following:
- Passport
- Vehicle registration
- After purchasing insurance, go to the Immigration window to get your passport stamped, your fingerprints scanned, and a picture of you taken
- Proceed to the Customs window where you will need to provide copies:
- Photo page of your passport
- Vehicle registration
- While the documents are being prepared (it takes about 5 minutes), you can go to the fumigation booth to pay 1 USD for fumigation and get a receipt
- Return to the Customs window where you will be given the circulation authorization document
- Allegedly, the bike and all our luggage were supposed to be inspected, but the helper thwarted that for us
- Move the bike to the fumigation area to get it sprayed
- We paid the helper the suggested 20 USD plus an additional 3 USD to be given to the officer who did not inspect the bike
- Your passport and circulation authorization document will be checked at the checkpoint down the road before you can proceed further into Panama
Vehicle insurance is mandatory in Panama
***
Panama to Colombia
Monday – May 14, 2018
There are a number of options to get from Panama to Colombia, despite the break in the Pan-American highway that we know as the Darién Gap. You can go over (by plane), around (by boat), or through (only for the most intrepid souls, but still not recommended). There is also the option of shipping the bike in a container shared with other vehicles (cheaper than putting it on a plane) while you find a separate method of getting to Colombia.
We opted for the fastest and cheapest method, which is to use a plane (for us and the bike), so the information for this crossing is for anyone looking to do the same. We flew from Panama City to Bogotá with Copa Airlines as they offered the best deal at 335.10 CAD for two people. Luggage allowance is two bags of 23 KG each per person (a total of 92 KG for the two of us). Be sure to pack wisely as they strictly adhere to the weight limitations. We had one bag between the two of us at 28 KG and still had to pay 100 USD for excess.
The bike was shipped four days beforehand through Air Cargo Pack. Details of how we went about this are below.
Exiting Panama
Duration: 1 hour
- Scan the following documents to send via email:
- Photo page of your passport and the page with the vehicle importation stamp
- Vehicle registration
- Vehicle importation document for Panama
- The day before shipping the bike, send the scanned documents to the following email addresses:
- You can pack your bike’s cases with anything you want, just be sure to secure things well as they don’t crate it (we even tied our helmets on the back seat and strapped a dry bag on top of the top case); no inspection took place
- On the following day, take the bike to the airport as early as possible; around 8:00 AM as the ride is around 30 minutes from the city center and the road is not great
- The cost of shipping the bike is 1,100 USD and they take cash only
- At the cargo terminal, you will be given a document that you will need to take back to customs, which is a little before the terminal itself
- You will need to take the original copies of the following to the left-most window on the ground floor:
- Passport
- Vehicle registration
- Document provided by Air Cargo Pack
- Vehicle importation document for Panama
- The officials will give you a document that you will need to get stamped at the right-most window on the same floor
- Return to the cargo terminal with the stamped document and your bike will be loaded for shipping right away
- Your bike will be shipped after 9:00 AM and you have nothing more to do until you reach Colombia
Entering Colombia
Duration: 2 hours
- After landing in Bogotá, go to the Air Cargo Pack (we went early on the next day) with the following documents:
- Passport
- Vehicle registration
- Document from the Panamanian Air Cargo Pack
- The officials will make copies and prepare all the necessary paperwork for the DIAN (Colombian customs)
- Accompany the Air Cargo Pack employee to the DIAN where the paperwork will be submitted and you will need to wait for them to call you back after they prepare everything
- Verify and sign the paperwork before returning to the Air Cargo Pack terminal where the bike is unloaded and you are good to go
- Insurance for temporary imported vehicles can be done at the Suramericana Seguros (SOAT) office (we used this one)
Vehicle insurance is mandatory in Colombia
***
Colombia to Ecuador
Rumichaca Border
Tuesday – July 31, 2018
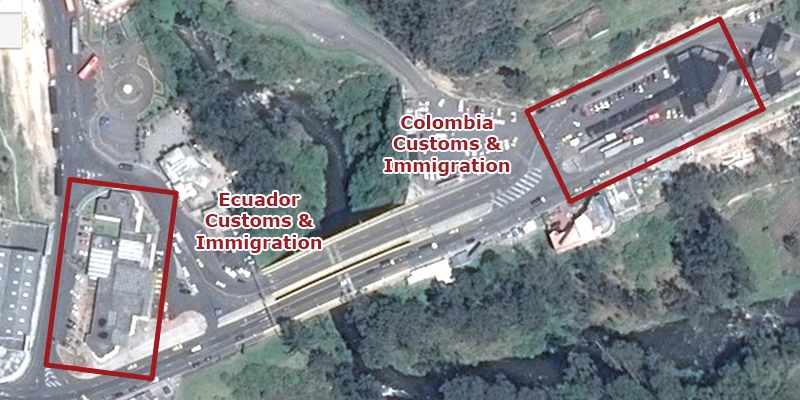
Exiting Colombia
Duration: 20 minutes
- As you approach the border, you will be approached by helpers who will guide you to a parking spot; there is a small lot on the right where you should be able to park
- Go to the Immigration building where you will see two lines; the one on the right is for Venezuelans without passports and the one on the left is for everyone with passports (a helper managed to extort 20 USD out of us by telling us that the left line is a “fast” line and has a cost to get into – don’t be fooled like us and you can always ask the guard at the front of the lines when in doubt)
- After getting your passport stamped, the exit will lead you directly to the Customs window where you simply hand over your importation document to cancel your vehicle importation
- You can proceed to the Ecuador side and rejoice at not having to make any copies of your documents or to pay any fees
Entering Ecuador
Duration: 50 minutes
- Go around the back of the Customs and Immigration building to park your vehicle
- After parking, circle back around the building to where you will see the door to the Immigration office against the far back wall (this border crossing is crowded and disorganized due to the large number of Venezuelans and lack of signage so you may need to ask an official to be sure you are at the right place)
- Once your passport is stamped, you will need to exit and turn right to get to the Customs office to do the vehicle importation
- You will need to provide your original passport, driver’s licence, and vehicle registration to the officer to take pictures of them
- The officer will then accompany you to your vehicle to take pictures of the license plate and VIN
- Return to the building with the officer who will print out documents that you will need to get copies made of at the Customs window
- Take the copies back to the officer to get them stamped before you can proceed into Ecuador
Vehicle insurance is not mandatory in Ecuador
***
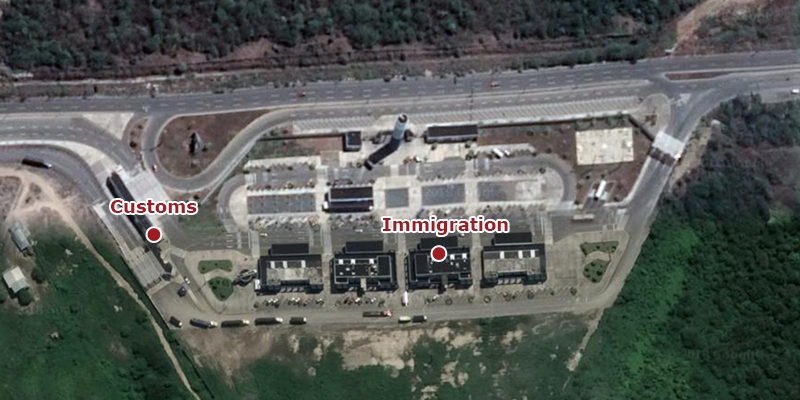
Ecuador to Peru
Huaquillas Border
Monday – August 20, 2018

Exiting Ecuador
Duration: 1 hour 10 minutes
- As you approach the border, turn left (direction CEBAF) before the big exit sign that leads you into Peru; this is where the Ecuador Customs and Immigration is
- There is ample parking near the Immigration office so you can park anywhere and join the line-up to get your exit stamp; the line moves very slowly (we were in it for an hour), but once you get in, the process is quick
- Once you have the exit stamp on your passport, proceed to the Customs window
- Provide your passport and the vehicle importation document to the officer
- The officer will keep the vehicle importation document and return your passport to you so you can proceed to the Peru side
Entering Peru
Duration: 45 minutes
- On the Peru side, you can park your vehicle in front of the big “Peru” sign
- Enter the Customs and Immigration building through the first door to get the entry stamp on your passport
- After getting the entry stamp, go to the officials along the back wall to do the vehicle importation; you will need to provide your passport and vehicle registration
- When the vehicle importation is complete, you can go to one of the kiosks on the left to get insurance; we were quoted 35 USD for one month and 55 USD for two months, pay in cash (we went with two months)
- There is an ATM in the complex if you need cash and don’t forget to take an obligatory selfie in front of the “Peru” sign before leaving
- At the final checkpoint, you will need to show your passport and the vehicle importation document before proceeding into Peru
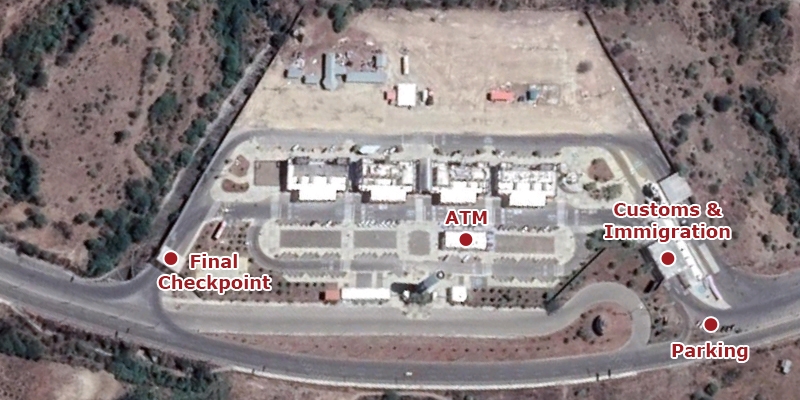
Vehicle insurance is mandatory in Peru
***
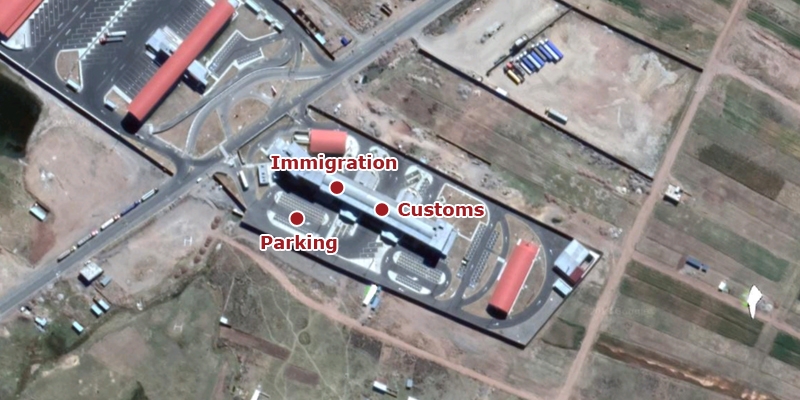
Peru to Bolivia
Desaguadero Border
Tuesday – October 2, 2018
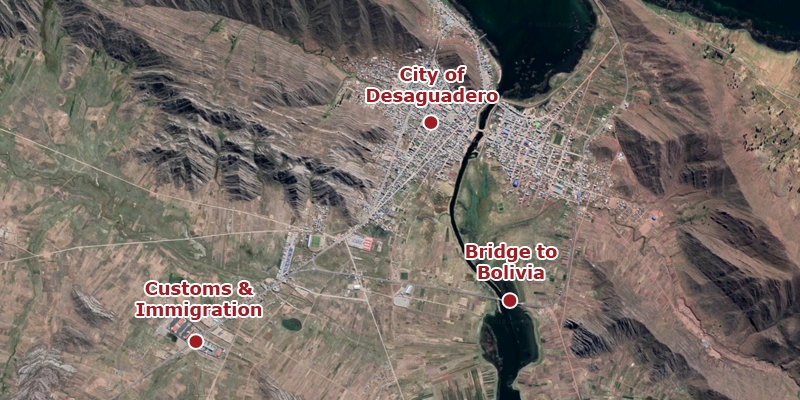
Exiting Peru & Entering Bolivia
Duration: 45 minutes
- From the city of Desaguardero, continue along the 36A until you reach some large and new-looking buildings on both sides of the road; take a left turn as the Customs and Immigration for both countries are here
- A guard at the gate will check your passport and take note of your name before letting you enter
- Park in the first parking lot you see and enter the Immigration building; you will first need to get the exit stamp on your passport at the Peru counter on the left and then get the entry stamp at the Bolivia counter on the right
- Once you get the stamps on your passport, take your bike and go around the building to the Customs window on the side; the officer for Peru sits on the left and the officer for Bolivia sits on the right side of the same window
- As you wait for your turn, a couple of officers will approach you and ask to check your passport as well as the contents of your luggage
- Once they are satisfied, you will be given a form to fill and submit to the Bolivian officer at the Customs window
- To cancel the vehicle importation for Peru, submit the permit document to the Peruvian officer
- Provide your passport and vehicle registration to the Bolivian officer to process the vehicle importation for Bolivia
- The officer will come outside to verify the bike’s VIN and license plate number before returning to process the documents
- You will be asked to signed two copies of the document; the officer will keep one and give you the other one before you are free to proceed into Bolivia
NOTE:
- There is no option to purchase vehicle insurance in the area so you will need to either travel to La Paz for it or buy it online; we bought insurance online with UNI Vida
- There are no ATMs or money changers in the area and we did not see any place to withdraw or exchange money until we got to La Paz
Vehicle insurance is mandatory in Bolivia
***
Bolivia to Chile
Pisiga Border
Tuesday – October 16, 2018
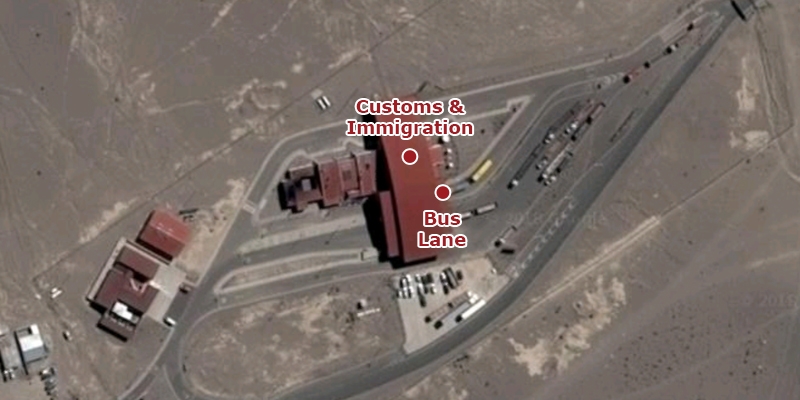
Exiting Bolivia & Entering Chile
Duration: 1 hour 30 minutes
- From the town of Pisiga, continue along Route 12, going past the welcome sign for Chile until you see the Customs and Immigration building; procedures for both countries are done in the same building
- We were instructed to go to the lane for buses so we parked the bike and entered the building through the doorway on the right of the lane; unfortunately for us, we arrived behind two buses so more than an hour was spent waiting in line
- Go to the far end of the room inside the building where you will find a metal table with four boxes; take one form for each person from the white box and one for your bike from the yellow box labeled “Vehículos Menores” and fill them out as you wait in line
- The first window you will come across will be the Customs and Immigration for Bolivia; you will need to provide the vehicle importation permit, the vehicle registration, and your passport to the Customs officer
- The officer will accompany you outside to your bike to verify the VIN and license plate before returning; the vehicle registration and your passport will be returned to you while the vehicle importation permit will be retained by the officer
- Provide your passport and the form you filled out for your vehicle to the next officer at the same window; the officer will stamp your passport and the form before you can proceed to the next window for the Chile procedures
- Provide your passport and the stamped vehicle form to the officer at the Immigration window for Chile; he will stamp your passport and the form, and return both to you along with immigration cards (valid for 3 months) for each person (the cards will need to be retained for exiting Chile)
- You will need to go through the customs declaration section where you will need to provide the form you filled out for each person; the officer will ask if you are carrying any fruits or plants and, once satisfied, he will retain the forms and allow you to proceed
- At the Customs window, provide the form you filled out for the vehicle and the vehicle registration; the officer will verify the VIN and license plate of the bike before returning to prepare the paperwork
- The vehicle registration will be returned to you as well as the form with an additional stamp, and the vehicle importation permit document (valid for 3 months) will be provided to you before you can proceed
- The form for the vehicle will need to be submitted to the officer as you exit with your bike
NOTE:
- Be sure to fill up on gas before leaving Bolivia as there are no gas stations on the Chilean side until Pozo Almonte, which is 195 kilometers from the border (around 2 hours 20 minutes’ ride)
- There is no option to purchase vehicle insurance (SOAPEX) in the area, but it is possible to buy it online through soapex.com; we bought it from HDI for 1 month at 24 USD
- Tolls are not free for bikes in Chile and the cost is different each time; we have paid from 350 CLP to 800 CLP and each time we paid in cash as we had change on us so we are unable to confirm if payment by credit card is accepted
- There are no ATMs in the area and the only money changer we came across was on the Bolivian side, before getting to the Customs and Immigration building; we recommend changing any Bolivian currency you have as you will not need them and they’re not as easy to change once outside of Bolivia
Vehicle insurance is mandatory in Chile
***
Chile to Argentina
Paso Cardenal Antonio Samoré Border
Thursday – November 15, 2018
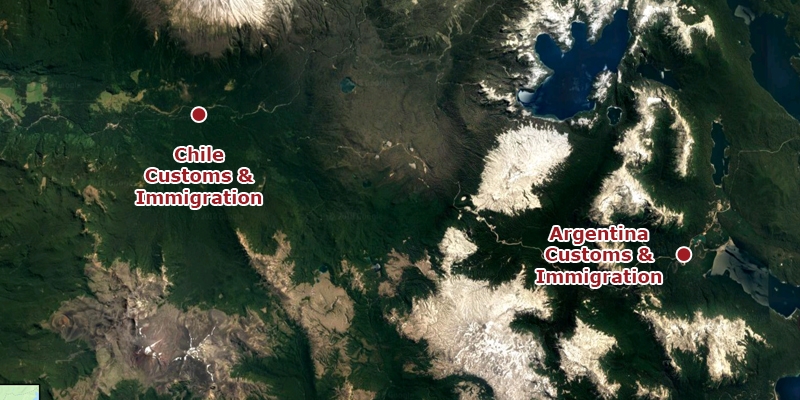
Exiting Chile
Duration: 5 minutes
- As you approach the Customs and Immigration building, you will be stopped at a checkpoint where an officer will ask to see your vehicle registration document
- After verifying your vehicle’s license plate number, the officer will give you a piece of paper with the license plate number and the number of passengers
- Park your bike in the designated parking area and proceed through the makeshift passage way to enter the Customs and Immigration building
- Go to the window labelled “1” to get the exit stamp on your passport and a stamp on the piece of paper that was provided at the initial checkpoint
- Proceed to the window labelled “2” to cancel the vehicle importation and receive another stamp on the piece of paper
- As you proceed towards the exit, you will come across another checkpoint where you will need to give the officer the piece of paper from the initial checkpoint with the two stamps before you can continue
Entering Argentina
Duration: 10 minutes
- The Argentinian Customs and Immigration is a scenic 40-minute ride from the Chilean one
- Like the Chilean side, you will come across a checkpoint as you approach the Argentinian Customs and Immigration building where you will need to provide your vehicle registration document and be given a piece of paper with your license plate number and number of passengers
- Park your bike in the designated area and enter the building where you will have the Immigration section first; you will get the entry stamp on your passport and a stamp on the piece of paper
- The Customs section is towards the back; you will need to provide your vehicle registration and passport to the officer to process the paperwork
- Your documents will be returned to you with the vehicle importation document and you will also get a stamp on the piece of paper before you can proceed
- As you proceed towards the exit, you will need to provide the piece of paper with the two stamps before you can continue into Argentina
NOTE:
- While you will see numerous vendors selling vehicle insurance for Argentina close to the border crossing in Chile, there is no option to purchase it at the border
- After being sent on a wild goose chase, we were finally able to purchase insurance at La Segunda in Bariloche; we purchased for three months at 819 ARS
Vehicle insurance is mandatory in Argentina
***
Argentina to Brazil
Iguazu Border
Friday – November 30, 2018
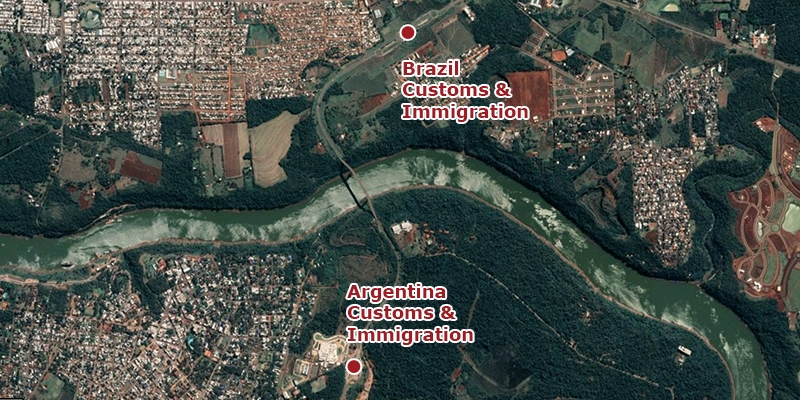
Exiting Argentina
Duration: 20 minutes
- As you approach the border crossing, you will see a row of booths to your right; go to one of these booths
- You will need to provide your passport to the officer to receive the exit stamp
- After receiving the stamp, proceed to the small building on the right side after the booths; this is where you will need to cancel your vehicle importation
- When we got there, the only officer on duty was not in the office so we had to wait for about 15 minutes before he returned
- The officer took the document and said that the vehicle importation will be cancelled; nothing was given to us and we were free to proceed
Entering Brazil
Duration: 1 hour
- The Brazil Customs and Immigration is around a 10-minute ride from the Argentina one
- Once you get there, park in the designated parking area and enter the Immigration building; you will need to provide your passport and a print-out of your e-visa (if applicable)
- Once you receive the entry stamp on your passport, go to the smaller building that will be on your right as you exit the Immigration building; this is where you will do your vehicle importation
- The Brazil side was less organized than expected because we were taken from that building to another one on the other side of the complex and then brought back to the first one; this is where most of our time went
- The officer will prepare the paperwork, get you to sign some papers, and he will give you a temporary document for the vehicle importation; the official document will be sent to you by email
- When we asked about insurance, the officer told us that it is not mandatory for short-term and we were free to proceed into Brazil
NOTE:
- USA, Canada, Australia, and New Zealand passport holders are required to have a visa before entering Brazil
- Applications for the visa can be submitted electronically and must be done at least five days beforehand
- The website is www.vfsglobal.com/brazil-evisa/ and the cost is 40 USD per person
Short-term vehicle insurance is not mandatory in Brazil
***
Brazil to Uruguay
Jaguarão Border
Thursday – December 13, 2018

Exiting Brazil
Duration: 10 minutes
- Park in the designated area in front of the building and enter through the main doors; the Customs and Immigration window will be on your right
- Provide your passport and visa to the officer at the window for the exit stamp
- Submit the vehicle importation document to the officer and you can proceed to the Uruguay side
Entering Uruguay
Duration: 15 minutes
- The Uruguay Customs and Immigration is around a 10-minute ride from the bridge
- Park in front of the building and enter through the main doors; the Immigration window will be in front of you
- Once you get the entry stamp on your passport, proceed to the window on the left of the main entrance to do the vehicle importation
- Provide your vehicle registration, driver’s license, and passport to the officer to prepare the paperwork
- A copy of the vehicle importation document will be provided to you and you will be free to proceed into Uruguay
NOTE:
- Do not take the bridge before you do the exit procedure for Brazil as the Brazil Customs and Immigration building is very easy to miss; we did the Uruguay side first and had to return to do the Brazil side before proceeding into Uruguay
- If you need food, gas, and/or cash, be sure to get those before entering Ururguay as there is nothing between the border and the city of Treinta y Tres (around 1 hour and 30 minutes’ ride)
Vehicle insurance is mandatory in Uruguay
***
Uruguay to Argentina
Fray Bentos Border
Wednesday – December 19, 2018
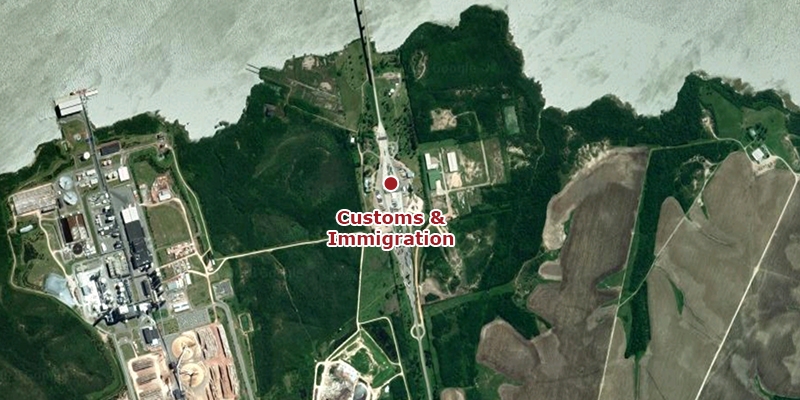
Exiting Uruguay & Entering Argentina
Duration: 5 minutes
- As you approach the border, you will come upon a booth; provide your passport to the officer in the booth to get the exit stamp for Uruguay and the entry stamp for Argentina
- The officer will ask to see the vehicle importation document and verify the information on the document
- The document will be returned to you and you can proceed and park a few meters ahead
- Enter the building to process the vehicle importation; you will need to provide your vehicle registration, driver’s license, and passport
- Once you receive your copy of the vehicle importation document, you can proceed into Argentina
NOTE:
- Right after the border crossing, there is a toll bridge that you can pay in Argentinian or Uruguayan pesos in cash; we paid 50 UYU
Vehicle insurance is mandatory in Argentina